How to Host Horilla HRMS Software Using Gunicorn+Nginx in Production?
Hosting a Django project using Gunicorn and Nginx is like having a well-coordinated team of servers working together to make your website run smoothly. Gunicorn is like the quarterback, catching user requests and passing them to the right players (worker processes) to handle them. Nginx acts as the coach, making sure everyone is in the right place at the right time, and distributing the workload evenly among the team. Together, they ensure your website stays fast, reliable, and safe for all your visitors, like a winning game plan for your online presence. Hosting a Django project using Gunicorn and Nginx is like having a well-coordinated team of servers working together to make your website run smoothly. Gunicorn is like the quarterback, catching requests from users and passing them to the right players (worker processes) to handle them. Nginx acts as the coach, making sure everyone is in the right place at the right time, and distributing the workload evenly among the team. Together, they ensure your website stays fast, reliable, and safe for all your visitors, like a winning game plan for your online presence.
Step 1: Install Nginx, Python, & Pip
Now, we’re going to install some software we need for our project. We’ll install Nginx, which is a web server, Python3, which is a programming language, and Pip3, which is a package manager for Python.
sudo apt updatesudo apt install python3-dev nginx python3-pipStep 2: Create a Virtual Environment
sudo pip install virtualenv

virtualenv env
source env/bin/activateUsing a virtual environment creates a controlled environment for our project, preventing conflicts and ensuring consistent behavior across different systems.
Step 3: Clone Horilla Opensource & Install Requirements
Clone the Horilla Open Source repository using
git clone https://github.com/horilla-opensource/horilla.gitNavigate to the project directory with
cd horillaInstall the project’s dependencies by running
pip install -r requirements.txtExecute make migrations to create migration file
python3 manage.py makemigrationsApply the migrations command to update the database schema.
python3 manage.py migrateFinally, start the server to check the project is working.
python3 manage.py runserver 0.0.0.0:8000Please verify that the project is operational, similar to what is shown in the image provided.

Step 4: Install Gunicorn on Virtual Environment & Configure Gunicorn
pip install gunicorngunicorn --bind 0.0.0.0:8000 horilla.wsgiPlease verify that the project is operational, similar to what is shown in the image provided.

Now, we can deactivate the environment.
deactivateOpen the file for editing with the following command and add the below details
sudo nano /etc/systemd/system/gunicorn.socket[Unit]
Description=gunicorn socket
[Socket]
ListenStream=/run/gunicorn.sock
[Install]
WantedBy=sockets.targetYou can save this file using ctrl+s and exit from the file using ctrl+x. It allows external services, like Nginx, to communicate with Gunicorn through the Unix socket, improving performance and security.
Gunicorn Service File Configuration
Configuring the service file is crucial when hosting Django on a production server. To properly configure it, follow the instructions below.
sudo nano /etc/systemd/system/gunicorn.serviceUse this command to open a file and paste the following details onto that page.
[Unit]
Description=gunicorn daemon
Requires=gunicorn.socket
After=network.target

[Service]
User=ubuntu       #  1 .
Group=www-data    #  2 .
WorkingDirectory=/home/ubuntu/horilla     #  3 .

ExecStart=/home/ubuntu/env/bin/gunicorn \  #  4 .
          --access-logfile - \
          --workers 3 \
          --bind unix:/run/gunicorn.sock \
          Horilla.wsgi:application

[Install]
WantedBy=multi-user.target
Now, update the content on this page based on your device. Follow the numbers shown in the image below to update the content on the page.
1. User
Use the following command to know your user.
whoamiUpdate the response on User=RESPONSE_VALUE.
2. Group
To know the group use the following command
groups USERChange “USER” to your user. It will then respond with the group name and update the service file with a response.
3. WorkingDirectory
To obtain the path of the project directory, navigate to the project directory folder and execute the following command.
pwdIt will respond with the full path of the project directory.
4. ExecStart
To obtain the path containing the gunicorn path in the virtualenv, navigate to the env directory in the command line and execute the following command.
pwdThe response will be something similar to this: /home/ubuntu/env/. Now include the following full path: /home/ubuntu/env/bin/gunicorn. Use the response path on the ExecStart= YOUR_PATH
To save changes, press Ctrl+S, and to exit the file, press Ctrl+X.
To apply the changes in the service file use the following command.
sudo systemctl daemon-reloadNow enable the gunicorn socket using the following command. These commands start the Gunicorn socket service and enable it to start automatically on system boot.
sudo systemctl start gunicorn.socketsudo systemctl enable gunicorn.socketStep 5: Configure Nginx
This Nginx configuration file /etc/nginx/sites-available/horilla is used to define how Nginx should handle incoming requests for the Horilla Django project.
sudo nano /etc/nginx/sites-available/horillaserver {
listen 80;
server_name 16.16.201.235; # 1 .
location = /favicon.ico { access_log off; log_not_found off; }
location static/ {
root /home/ubuntu/horilla; # 2 .
}
location media/ {
root /home/ubuntu/horilla; # 3 .
}
location / {
include proxy_params;
proxy_pass http://unix:/run/gunicorn.sock;
}
}- server_name 16.16.201.235;
Use your server IP or domain here.
- location static/ and location media/
This is the path “/home/ubuntu/horilla;” of the project directory. To get the full path you can navigate to the project directory in the command line and use the following command.
pwdIt will respond with a full path and add that path here.
location static/ {
        root ADD_YOUR_PATH;
    }
location media/ {
        root ADD_YOUR_PATH;
    }
These comments provide helpful context for anyone reading or maintaining the configuration file, making it easier to understand the purpose of each configuration directive.
Save and exit the file using Ctrl+S to save and Ctrl+X to exit the editor.
To apply the changes and save the file use the following commands.
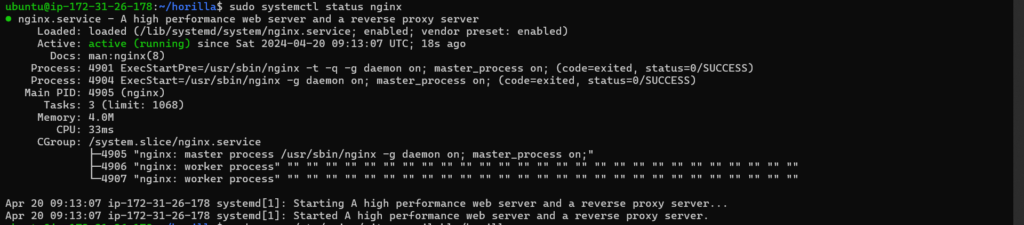
sudo ln -s /etc/nginx/sites-available/horilla /etc/nginx/sites-enabled/sudo systemctl restart nginxsudo systemctl status nginxAfter completing this, start nginx. Please verify that the project is operational, similar to what is shown in the image provided.
Now you can use the IP address on the web browser to access the project.
To read more about Django Deployment & Hosting, refer to our blog Django Deployment & Hosting: Technical Step-by-Step Guide in 2024
Conclusion
Gunicorn plays the role of the quarterback, directing requests to the right players (worker processes), while Nginx acts as the coach, making sure everyone knows their role and works together smoothly. By following the steps outlined, we’ve set up a system where your website can perform at its best, delivering a fast, reliable, and secure experience for your visitors. It’s like having a winning game plan for your online presence!