How to Create a Powerful CRUD App Using Django?
Step 1: Set up a new Django project & create a new app called ‘note.’
This step involves creating a new Django project using the django-admin startproject command and creating a new Django app using the python manage.py startapp command.
django-admin startproject myproject .

python manage.py startapp note
Add the app label on an installed app on setting.py
# in settings.py

INSTALLED_APPS = [
    'django.contrib.admin',
    'django.contrib.auth',
    'django.contrib.contenttypes',
    'django.contrib.sessions',
    'django.contrib.messages',
    'django.contrib.staticfiles',
    # add the installed app here...
    'note',
]
After that, run the command.
python manage.py migrateStep 2: Create & link URLs for the ‘note’ app.
In this step, you define the URL patterns for the ‘note’ app in the note/urls.py file and include these URLs in the main project’s URL configuration (myproject/urls.py).
#  note/urls.py

from django.urls import path
from note import views
urlpatterns = [

]
Connect app URL with myproject urls.py
#  myproject/urls.py

from django.contrib import admin
from django.urls import path, include

urlpatterns = [
    path('admin/', admin.site.urls),
    path('',include("note.urls")),
]
Setup Template directory on settings.py
Step 3: Set up the template directory.
You configure the template directory by specifying the location of your templates in the Django project’s settings (settings.py) using the ‘DIRS’ option.
#  in settings.py

TEMPLATES = [
    {
        'BACKEND': 'django.template.backends.django.DjangoTemplates',
        'DIRS': [
            BASE_DIR/"templates"
            ],
        'APP_DIRS': True,
        'OPTIONS': {
            'context_processors': [
                'django.template.context_processors.debug',
                'django.template.context_processors.request',
                'django.contrib.auth.context_processors.auth',
                'django.contrib.messages.context_processors.messages',
            ],
        },
    },
]
Step 4: Set up the static directory.
This step involves configuring the static files directory in the Django project’s settings by specifying the location of your static files (such as CSS and JavaScript files).
# in  settings.py

STATIC_URL = 'static/'

STATICFILES_DIRS = [
    BASE_DIR / "static",
]
Step 5: Define the Note model.
In this step, you define the Note model in the note/models.py file using Django’s model syntax.
#  note/models.py

from django.db import models

# Create your models here.


class Note(models.Model):
    title = models.CharField(max_length=20)
    description = models.TextField()
After that run
python manage.py makemigrations

python manage.py migrate
Step 6: Define the NoteForm.
You define the NoteForm class in the note/forms.py file, which is a Django form that corresponds to the Note model.
#  note/forms.py

from django import forms
from note.models import Note

class NoteForm(forms.ModelForm):
    class Meta:
        fields = "__all__"
        model = Note
Add bootstrap form-control to the fields when they are initialized.
#  note/forms.py

class NoteForm(forms.ModelForm):
    class Meta:
        fields = "__all__"
        model = Note

    def __init__(self, *args, **kwargs):
        super(NoteForm, self).__init__(*args, **kwargs)

        self.fields["title"].widget.attrs.update(
            {
                "class": "form-control",
            }
        )

        self.fields["description"].widget.attrs.update(
            {
                "class": "form-control",
                "rows": "3",
            }
        )
Step 7: Define the views.
In this step, you define the views for creating, updating, and deleting notes in the note/views.py file.
#  note/views.py
from django.shortcuts import render,redirect
from note.forms import NoteForm
from note.models import Note
# Create your views here.

def note(request):
    """
    This method is used to create new note instance and view all the instances
    """
    # create instance for the form
    form = NoteForm()
    if request.method=="POST":
        form = NoteForm(request.POST)
        # save the modal instance if the form is valid
        if form.is_valid():
            form.save()
      # clearing the form data by redirecting to the same view
            return redirect(note)
    # get all note objects
    notes = Note.objects.all()
    return render(request,"index.html",{"form":form,"notes":notes})

def update_note(request,id):
    """
    This method is used to update the note instances
    """
    # get the instance
    instance = Note.objects.get(id=id)
    # initialise form instance with the note instance
    form = NoteForm(instance=instance)
    if request.method=="POST":
        form = NoteForm(request.POST,instance=instance)
        # save the modal instance if the form is valid
        if form.is_valid():
            form.save()
            # redirect to the note method or '/' path if the form is valid
            return redirect(note)
    return render(request,"index.html",{"form":form})


def delete_note(request,id):
    """
    This method is used to delete note instance
    """
    Note.objects.get(id=id).delete()
    return redirect(note)
Step 8: Create the Template Files.
Create index.html, view_note.html, and form.html templates inside the templates/ directory.
<!DOCTYPE html>
<html lang="en">
<head>
    <title>Note App</title>
    <link href="https://cdn.jsdelivr.net/npm/bootstrap@5.1.3/dist/css/bootstrap.min.css" rel="stylesheet" integrity="sha384-1BmE4kWBq78iYhFldvKuhfTAU6auU8tT94WrHftjDbrCEXSU1oBoqyl2QvZ6jIW3" crossorigin="anonymous">
</head>
<body>
    <h1>MY NOTE</h1>
    {% block content %}
    {% endblock content %}
</body>
</html>
Create view_note.html
{% for note in notes %}
<div class="card mt-2 w-100">
    <div class="card-body">
        <h5 class="card-title">{{note.title}}</h5>
        <p class="card-text">{{note.description}}</p>

        <a href="{% url 'update-note' note.id %}" class="btn btn-primary">Edit Me</a>
        <a href="{% url 'delete-note' note.id %}" class="btn btn-danger">Delete Me</a>
    </div>
</div>
{% endfor %}
Create form.html
{% extends 'index.html' %} {% block content %}
<form action="" method="post">
    {% csrf_token %}
  {{form}}
  <button type="submit" class="btn btn-success mt-2">Add</button>
</form>

{% include "view_note.html" %}

{% endblock content %}
Step 9: Register the views with URL patterns.
In the note/urls.py file, map the views to corresponding URLs.
from django.urls import path
from todo import views

urlpatterns = [
    path("", views.note, name="note"),
    path("update-note/<id>/", views.update_note, name="update-note"),
    path("delete-note/<id>/", views.delete_note, name="delete-note"),
]
Step 10: Run the server.
Start the development server to run the note-taking app.
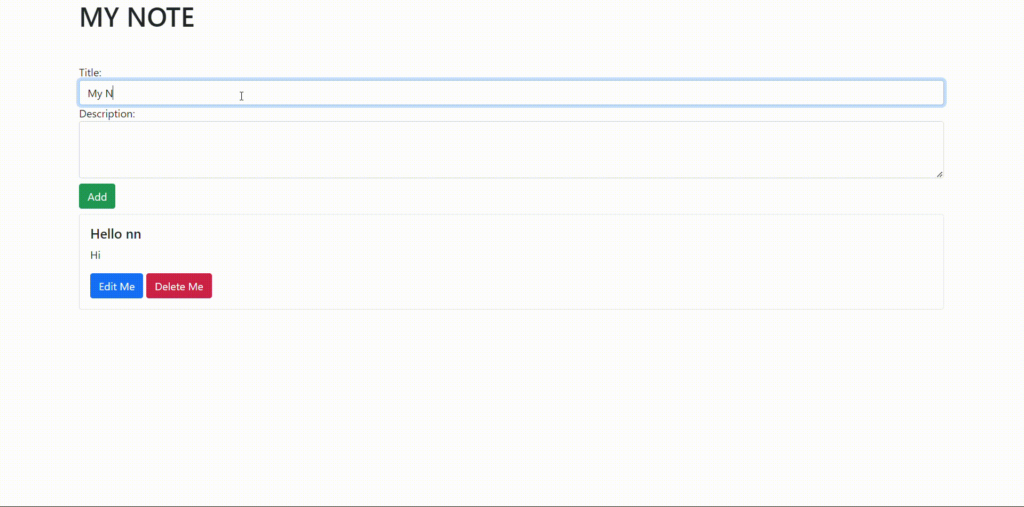
python manage.py runserverNow navigate to http://localhost:8000
Now you are good to go!
Final out
Conclusion
In this blog, we learned how to create a CRUD (Create, Read, Update, Delete) app using Django.
We followed these steps:
- Set up a new Django project and created a new app called ‘note.’
- Created and linked URLs for the ‘note’ app.
- Set up the template directory.
- Set up the static directory.
- Defined the Note model.
- Defined the NoteForm.
- Defined the views for creating, updating, and deleting notes.
- Created the template files.
- Registered the views with URL patterns.
- Ran the server and tested the note-taking app.
By following these steps, we were able to create a basic Django app that allows users to create, view, update, and delete notes. You can further customize and enhance this app based on your requirements. Django provides many powerful features and tools to build robust web applications.
To read more about configuring HTMX in Django, refer to our blog How to Configure HTMX in Django Project: The Complete Guide